Website Instructions
WooCommerce Ordering Process
When an order comes in with a physical product, you will need to fulfill the order and then mark the order as “Completed.”
- In wp-admin, go to WooCommerce -> Orders
- Click on the order you want to fulfill (should have a status of “Processing”)
- Copy the Shipping information if you want to print out a label for the packaging.
- Once you’ve packaged and labeled the customer’s order, go back into the order and change the “Status” of the order from “Processing” to “Completed” and click the “Update” button (right-hand side of the screen) to save the changes.


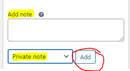
- If you want to let the customer know the shipping information, like the tracking number, add a note on the order. The “Add note” field is located on the right side of the screen. Type whatever you’d like the customer to know and change the drop-down field from “Private note” to “Note to customer” and then click the “Add” button.
Creating/Editing Product Categories
Creating product categories is simple to do, and categories can also be nested. Ex. You can create a “Books” category and then add the different book types as child categories, such as “eBook” or “Paperback.”
- In wp-admin, go to Products -> Categories
- Add a Name for your category, such as “Paperback,” and the add its Slug, like “paperback.” If it has a “Parent category,” like “Books” then select if from the drop-down menu. Parent categories must be created first.
Creating/Editing Product Attributes
Product attributes are things that are common across many products, like author, genre, language, series, etc. These attributes are useful for filtering store results and conveying information about your products to the customer.
- In wp-admin, go to Products -> Attributes
- Add a Name and Slug for the Attribute, like “Book Author” and “book-author” and click the “Add attribute” button.
- You will see your new Attribute in the table on the right-hand side of the screen.
- In that same table, you’ll click on the “Configure terms” link for your new attribute. This will enable you to add different “Book Author” values, like “Daniel Kuhnley” or “Marsha Kuhnley.”
Editing WooCommerce Products
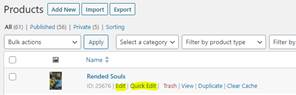
Changes to a product’s SKU, Stock status, price, sale price, and several other data points can be made via the “Quick Edit” option. Changes to the description, product image, and attributes must be made via the “Edit” option.
- In wp-admin, go to Products -> All Products
- Mouse over the product you want to make changes to and select either “Edit” or “Quick Edit” depending on the changes that need to be made.
Setting Product Attributes
Once you’ve created your product attributes, you will be able to use them within your products.
- In wp-admin, go to Products -> All Products and select a product for “Edit.”
- On the product edit page, locate the “Product data” section. One of the options is “Attributes,” and this is where you’ll use your new attributes. Click it.
- You’ll see a “Add new” button and a drop-down list that says “Add existing.” Click on the drop-down list and you’ll be able to select one of your attributes to add to the product.
- Click in the Values” field and it will load your terms for that attribute. Select as many as applicable.

Setting/Changing Tax Rate
As tax rates change for your state, you’ll want to make sure your tax rate in WooCommerce matches.
- In wp-admin, go to WooCommerce -> Settings and select the Tax tab.
- Click the “Standard rates” link.
- Modify your tax rate as needed and then click the “Save changes” button.
Delivering Virtual Products Via Bookfunnel
The best way to link WooCommerce products to Bookfunnel is to work backwards so that a purchase isn’t made before you get the link set up.
- Log into Bookfunnel -> https://dashboard.bookfunnel.com/
- Make sure the book you want to deliver has been added to Bookfunnel under Books. This can be an eBook or Audiobook (if you’re part of the beta).
- Click on “Sales”
- Click “Action” (top right) and then select “New Delivery Action”
- Fill out the form. The “Item SKU” field is what you’ll need to match up to your WooCommerce product. I always use the ISBN (ASIN is fine, too.)
- Save the Delivery Action
- Head over to wp-admin on your website, then go to Products -> All Products
- Create the virtual product you want Bookfunnel to deliver if it doesn’t exist. Otherwise, edit the product.
- Make sure the SKU (under “Product data” -> “Inventory”) matches the “Item SKU” of the Bookfunnel Delivery Action you created above.